

Seeds and workshop supplies for the farm. Sell harvests and hand-carried fish packs here.
- Getting there
- On foot from the farm
- Hand-carried fish
- Takes fish packs
The player's guide to the valley
Crops, fish, boats, recipes, prices, people and errands, read straight from the game so the numbers here are the ones you will meet.
A calm game about growing, fishing and carrying things to people who want them. Here is how to begin and how the parts fit.
Nevaland is a calm, three-dimensional life on a coast: you grow a farm, turn the harvest into bait and supplies, fish rivers, lakes and open sea, and carry what you catch and make to villages that actually want it. It runs in your browser and saves there too.
There is no combat: no weapons, no hostile creatures, no raids. The pressure comes from the weather, the clock, how much you can carry, how fresh a fish still is, which road is open, and the people waiting at the other end of a delivery.
The opening quests walk you through this on their own. If you would rather know where it is heading, this is the order.
Talk to Elspeth in the farmhouse yard. She gives you six wheat seeds and points you to the field. Your garden hoe is already equipped.
Leave spare seeds and materials in the chest at home; your satchel is small.
Choose Hoe ground or press 1, aim and click to loosen a patch. Then press 2 for the Seed Belt, choose wheat and plant three on fully worked soil. Then press E beside a dry crop to water it. See Farming.
Hand watering costs no Work. Rain waters the field too.
Harvest the wheat, grind it at the village mill, cultivate bait worms at the compost bin, and mix a chum bucket at the workbench. This is the first turn of the loop below. See Workshops and crafting.
Cast a line from the river bank with the willow rod. Worms shorten the wait for a bite. See Fishing.
Sell an item at the village produce market. Shops pay a fair price and charge more than they pay, so goods do not make money by being bought and resold. See Trade and money.
Meet Maeve at the fish market and Old Silas at the pier. Silas commissions the family rowboat for 30 gold and 1 Ground Grain, and from then on you can board her at the slip and take to the water. See Boats and cargo.
Every system feeds the next one. Progress opens new abilities, places and strategies rather than only adding a percentage.
Gold and experience from selling buy better tools, boats and recipes, which let you farm, process and fish further than before.
Hands-on jobs spend Work: hoeing, planting, harvesting, crafting, packing and fishing. You can store up to 750. It comes back at +10 every 5 minutes while the game is open, about 120 an hour, and in bigger bursts from sleeping at the farmhouse, cooked meals and chores at work stations.
Walking, sailing, riding, carrying cargo and talking never cost Work. A job needs all of its Work up front or it does not start, so nothing is half-spent. The exact costs and every way to earn it back are in Work.
One game day lasts about 60 real minutes. A season is 6 days, so it turns about every 6 real hours, and a full year of four seasons takes about 24.
Weather moves in fronts and changes how crops grow, which fish bite and how rough the sea is. See The valley.
The keyboard and mouse. The same list is on the title screen and in the pause menu. The prompt beside your character always shows what E will do right now.
How days, seasons and weather work, where the villages and landmarks are, and how fast each way of travelling gets you there.
The day is split into four windows. Fish bite in some windows and not others, people keep a schedule that follows them, and lighting changes at the same boundaries.
04:00 to 08:00
The light comes up. 13 of 15 fish species are active.
08:00 to 18:00
The long working day. 11 of 15 fish species are active.
18:00 to 22:00
You can sleep beside the farmhouse bed from dusk. 12 of 15 fish species are active.
22:00 to 04:00
Dark nights make the sea rougher. 6 of 15 fish species are active.
A year is four seasons of 6 days each: Spring, Summer, Autumn and Winter. The season changes which crops thrive, which fish run, and what shops and villages pay for goods. The journal's Accounts page keeps a calendar of the coast's fairs, seasonal wants and price peaks.
Weather moves in fronts that last roughly 6 to 12 game hours. It changes how fast crops grow, which fish are willing to bite, and how rough the sea is.
Crops grow at their normal rate.
Fish that favour it: Common Carp, River Perch, Golden Arowana, Atlantic Mackerel, Yellowfin Tuna, Pacific Sailfish, Blue Marlin, Sunreach Sardine, Golden Sea Bream and Greater Amberjack.
Crops grow at their normal rate.
Fish that favour it: Common Carp, Rainbow Trout, River Perch, Channel Catfish, Northern Pike, Sunreach Sardine and Golden Sea Bream.
Waters the soil, and crops grow 5% faster.
Fish that favour it: Common Carp, Rainbow Trout, River Perch, Yellowfin Tuna, Golden Sea Bream and Greater Amberjack.
Waters the soil, and crops grow 5% faster.
Fish that favour it: Channel Catfish and White Sturgeon.
Crops grow at their normal rate.
Fish that favour it: Common Carp, River Perch, Northern Pike, Atlantic Mackerel, Yellowfin Tuna, Pacific Sailfish, Broadbill Swordfish, Blue Marlin, Sunreach Sardine and Greater Amberjack.
Crops grow at their normal rate.
Fish that favour it: Rainbow Trout, River Perch, Northern Pike, Golden Arowana, White Sturgeon and Broadbill Swordfish.
Waters the soil, and crops grow 5% faster.
Fish that favour it: Channel Catfish, Broadbill Swordfish and Blue Marlin.
Crops grow at 75% speed and the soil dries fast.
Fish that favour it: Channel Catfish and Northern Pike.
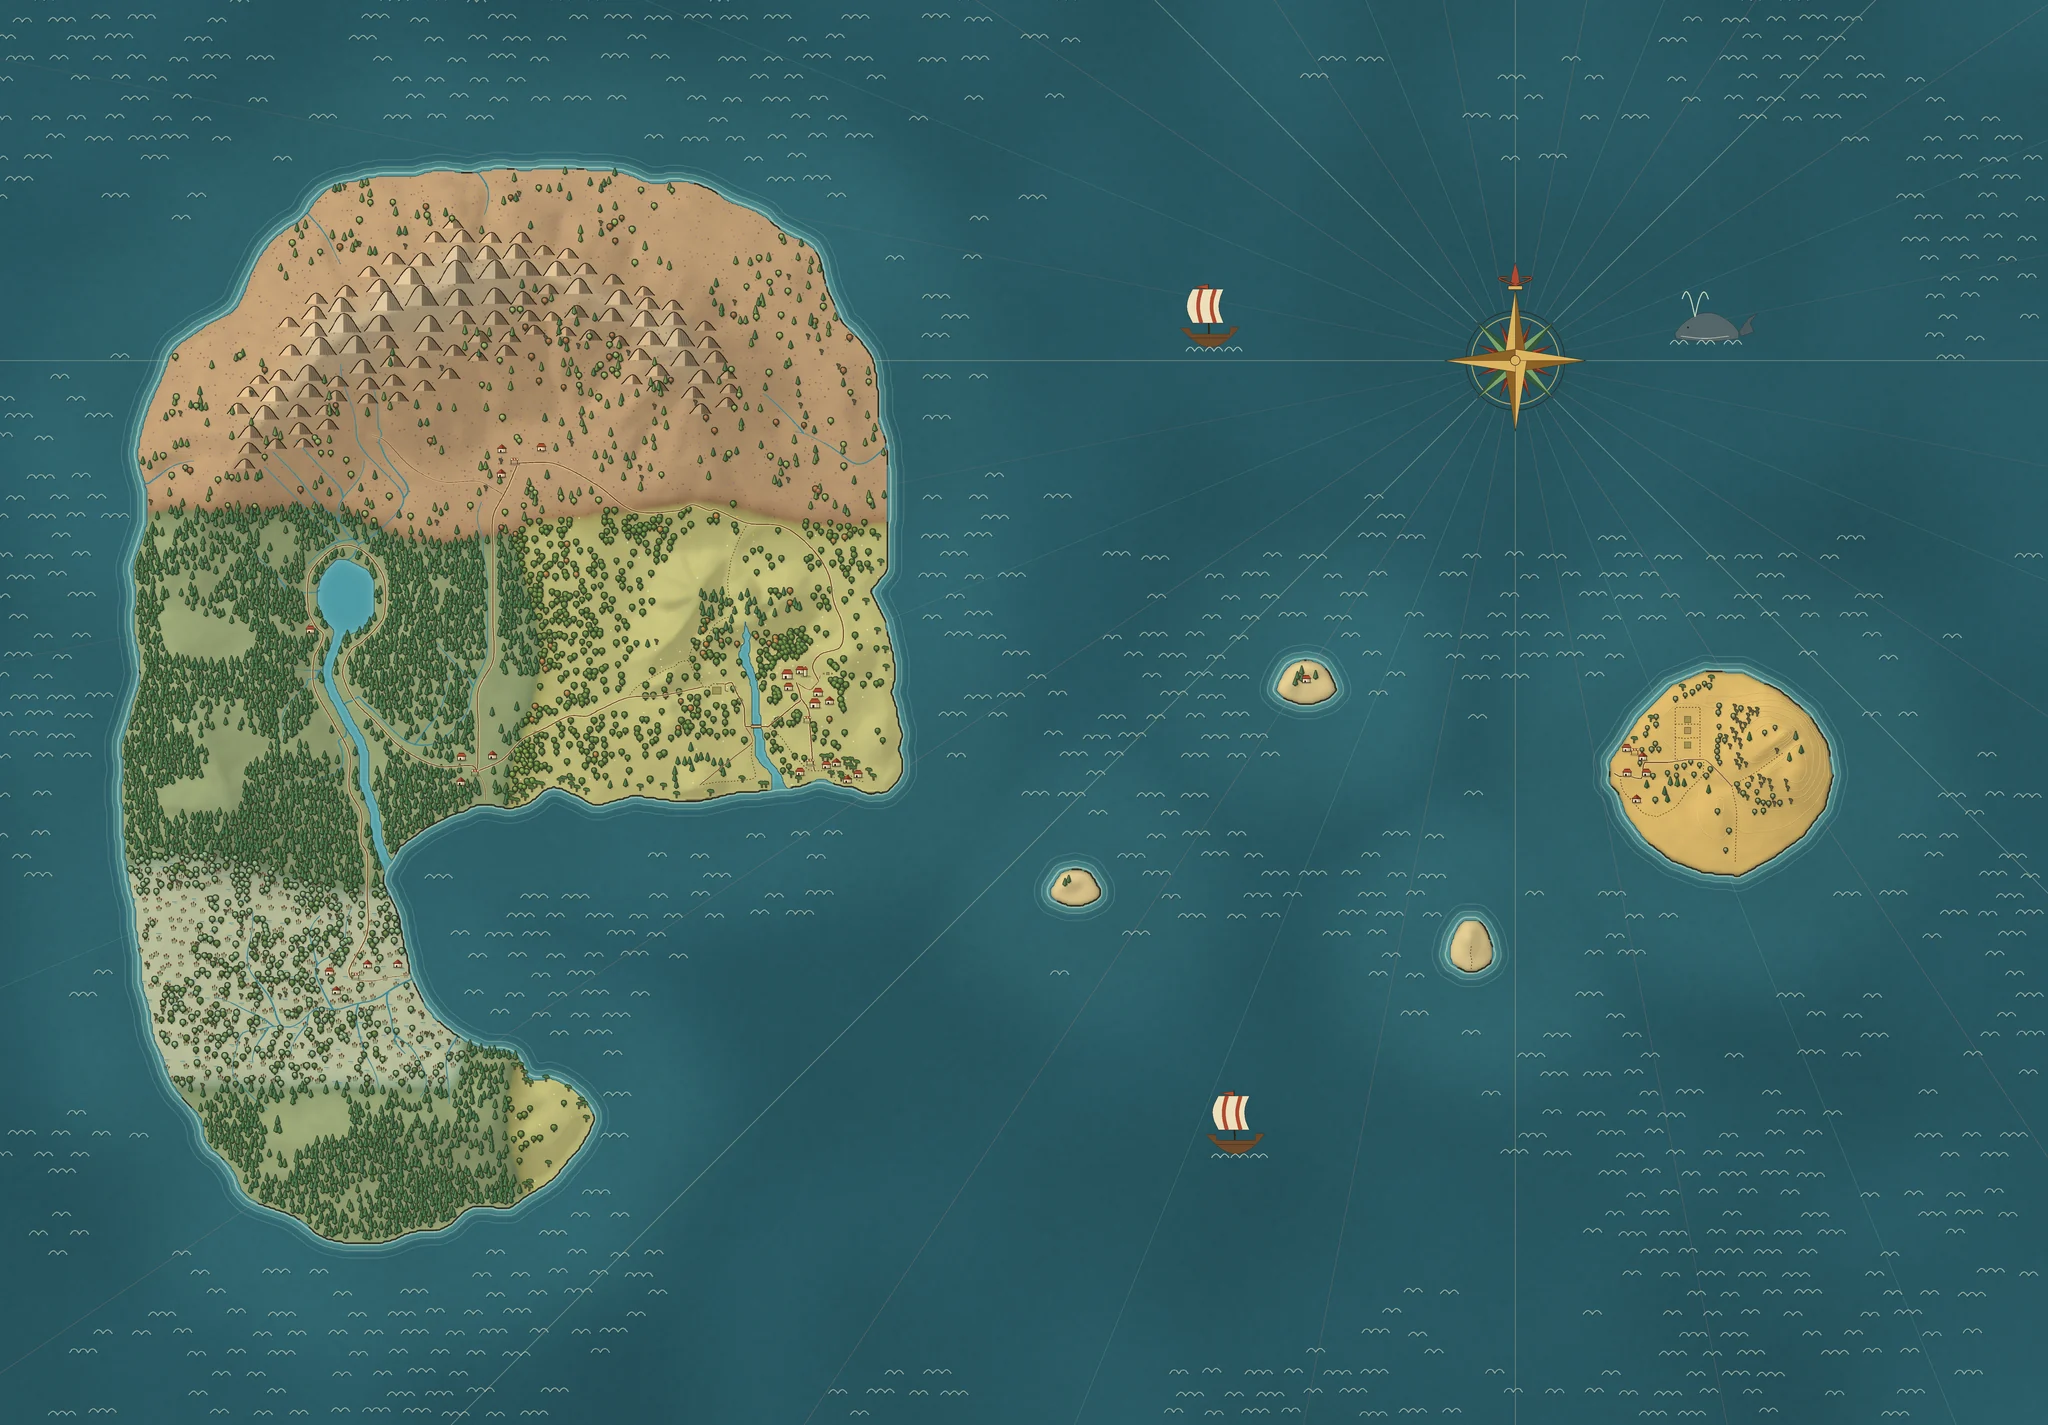 Highridge Uplands
Pinewatch Forest
Reedhaven Marsh
Sunreach Island
Nevaland VillageNevaland HarborSunreach CovePinewatchReedhavenHighridgeFamily FarmSunreach TerracesPinewatch LakeReedwater RiverSilverwater RiverReedhaven Cove GroundsNevaland Offshore GroundsVillage MillMountain SpringWestern OverlookHomestead HeightsLighthouse CliffsExposed RidgeSunreach Reef ShelfGull's RestDriftwood CayLantern ShoalThe Channel Seam
Seeds and workshop supplies for the farm. Sell harvests and hand-carried fish packs here.
Tackle, ice and voyage supplies. Hand in harbor orders here; sell other fish packs at village counters.
Terrace seeds, heavy tackle and voyage supplies. Buys local harvests and hand-carried catches.
Timber and cloth by the woodland road. Bring field produce and fish; the cove landing offers another route.
Bait, ice and fuel beside the marsh landing. Buyers take grain, orchard fruit and fish.
Root-crop seeds and workshop supplies above the cove. Bring seafood by road; there is no boat landing.
Where your journey begins. The starter fields, farmhouse bed, freshwater spring and workbench sit here beside the Silverwater trail.
Terraced warm-climate farmland rising above Sunreach Cove. Stone retaining walls catch the southern sun, allowing warm-climate crops to thrive.
A deep, cold freshwater lake enclosed by the western pine forests. Home to cold-water lake fish including Northern Pike, River Perch and Golden Arowana.
The winding river draining Pinewatch Lake south into the Reedhaven wetlands. Slow currents and silt bottoms shelter catfish and migratory river fish.
Runs from the Mountain Spring through the valley floor, past the family farm and village, before meeting the sea at Seabreak Harbor.
Shallow coastal flats and channels where the southern wetlands meet the sound. Sheltered water suitable for small rowboats and coastal angling.
The deep ocean reach south of Seabreak Harbor. Strong swells and deep channels attract massive pelagic sport fish like Tuna, Marlin and Swordfish.
The community windmill and millstone north of Nevaland Village. Mill wheat and barley into flour without burning fuel.
The Silverwater begins beneath the mountain. The trail returns through the western slopes to the homestead.
The western trail overlooks the fields and river. A path below the ridge joins the road toward Pinewatch.
The mountain path begins beside the homestead, connecting the fields to the headwaters.
The lighthouse watches Nevaland's southern shore and the water beyond the harbor.
Above Sunreach's terraces, the exposed ridge looks across the island and channel.
The southern reef shelf marks Sunreach's outer coast, beyond the sheltered cove.
Gulls nest above a quiet landing strewn with pale pebbles. The southern drop-off holds coastal schools; the low island is a useful bearing when Nevaland disappears into haze.
A weathered fishing camp sits behind the beach. Its saved fuel can and chum are yours to carry onward. Search the water east of the cay for a passing school.
A pale stone spire rises above the last small anchorage before Sunreach. An iron bracket at its top holds nothing. Beyond its southern shelf, deep-water fish pass through the channel. Leave room in the hold before following them.
Someone keeps the old camp chest stocked: a sealed fuel can, a bucket of chum, and a scrap of oilcloth in the lid that reads “for whoever shelters here next.” The supplies are in your satchel now; the empty camp remains a useful landing.
The crossing opens in every direction here. Watch for surface schools before choosing the northern cay or the direct course to Sunreach. Keep fuel for the way back.
Nothing matches. Clear a filter or try another word.
Moving costs no Work. Sprinting, galloping and trotting use a stamina bar that refills on its own after a short rest, so the choice is about pace, not cost.
| Way of travel | Speed | Time per km | Notes |
|---|---|---|---|
| On foot | 2 m/s | 8.3 min per km | Always free |
| Sprint | 5.2 m/s | 3.2 min per km | Hold Shift; about 9 s of stamina |
| Donkey, walk | 2.6 m/s | 6.3 min per km | Press H to call it beside you |
| Donkey, trot | 6.7 m/s | 2.5 min per km | The everyday pace |
| Donkey, gallop | 8.6 m/s | 1.9 min per km | about 14 s of stamina |
| Horse carriage, walk | 1.9 m/s | 9 min per km | Roads are faster than rough ground |
| Horse carriage, trot | 3.7 m/s | 4.5 min per km | about 20 s of stamina |
| Wooden Rowboat | 4.5 m/s | 3.7 min per km | No fuel |
| Coastal Fishing Skiff | 8.5 m/s | 2 min per km | Burns fuel cans |
| Sunreach Trading Coaster | 6.2 m/s | 2.7 min per km | No fuel |
Speeds are top speed in good conditions. Slopes, soft ground, rough water and cargo all slow you down. Boats and cargo covers carriages, wagons and the hulls in detail.
Hoe, plant, water and harvest. Every number on how fast crops grow and what makes them better, and a card for each of the crops.
Choose Hoe ground, or press 1 near a farm. Aim at empty legal ground, then click or press E. The preview shows the area and Work before you commit. A stroke beside a growing crop works the ground around it and leaves the crop's own soil alone.
One press makes one stroke; hold to continue across adjacent ground. Escape puts the hoe away.
With seeds in your satchel, choose Plant or press 2 near a farm. The Seed Belt opens so you can pick a crop. Pick one that suits the plot's climate; climate decides how fast it grows.
Buy seeds at village stalls. Every crop lists where.
Point at clear, prepared soil and click. A ring shows the spacing the crop needs and corner brackets show its footprint.
Trees are wide: an apple or olive takes about 2.5 metres each way.
Inspect a crop with a right click: its card shows the grade it is heading for and, while it grows, what keeping it wet would make of it. A crop the card calls Normal still grades better kept wet. Press E beside a crop to water it. Hand watering is free, and rain waters the field for you.
The field pump waters every crop at once.
A ripe crop shows its mature stage. Press E beside it to harvest, then sell it, mill it or pack it. Better care gives a better grade.
| Job | Work |
|---|---|
| Hoe a full patch | 2 for 2 × 2 m |
| Plant | 5 |
| Water by hand | Free |
| Harvest | 10 |
| Pick an orchard tree | 30 |
| Remove a plant | 10 |
| Fertilize | 5 |
| Spread compost | 5 |
| Lay mulch | 3 |
| Pull weeds | 3 |
| Dig in a cover crop | 8 |
| Field pump | 5 plus 1 per crop |
These are the starting costs. Higher Farming ranks and some gear cut them; the Work section has the full picture.
Each crop has a base growing time. Four things scale it, and they multiply together. The total is held between 0.5× and 1.5×, so no single field is ever hopeless or unstoppable.
| Factor | Condition | Growth speed |
|---|---|---|
| Climate | The plot's climate is one the crop prefers | 1.2× |
| Climate | A neutral climate for that crop | 1× |
| Climate | A poor match | 0.8× |
| Moisture | Soil at 40 or above | 1× |
| Moisture | Dry: below 40 | 0.85× |
| Moisture | Very dry: below 15 | 0.6× |
| Fertility | Excellent: 80 or above | 1.1× |
| Fertility | Normal: 30 to 79 | 1× |
| Fertility | Poor: below 30 | 0.8× |
| Weather | Rain or storm | 1.05× |
| Weather | Any other weather | 1× |
| Weather | Drought | 0.75× |
Weeds slow a crop after that limit: light weeds to 0.9×, heavy weeds to 0.8×.
Each worked patch has its own fertility rating from 10 to 100. Each harvest uses some up beneath that crop, and how much depends on the crop (0, 5, 8, 10, 12, 14 and 15 points a harvest across the crops here). Tired soil grows crops slowly, gives lower grades and smaller harvests: below 30 fertility a crop gives only the least of its range, and from 80 never less than the middle of it. You can read it on the bed before you sow: rich ground is a dark, crumbly loam, poor ground dries pale and dusty, and the fair ground between keeps the plain tilth. The crop card gives the exact figure.
Fish Fertilizer restores up to 20 points in the selected local patch. Press 4 for Soil care, pick the fertilizer, aim and check the dose before applying; a full patch refuses the dose without spending it. Fed ground turns dark and flecked with pale meal, and takes no second dose until the crop on it is harvested or dug in; a stroke reaching over it feeds only the unfed part. It affects future growth, never the recorded care of an already ripe crop. You make it from three Fish Scraps at a fish table, so every fish you clean feeds a field. Keep your fishing and your farming connected: this is the loop in miniature. Hold Alt on a farm to read the soil overlay.
Garden Compost is plant matter rotted down at the farm's compost bin. A dose raises the patch's organic matter by 40 and its fertility by 10, and rich soil holds water longer, so its crops dry out more slowly. Plant Matter laid as mulch covers the patch in straw and slows drying further; it is worked into the soil when the crop beneath it is harvested or the ground is hoed. Each harvest draws some organic matter back out. Both are picked from the same Soil care strip, and a patch that would gain nothing refuses the dose without spending it.
Prepared ground supports 3 annual harvests before it needs loosening again. Stubble marks a harvested bed; you can sow again while it remains prepared, or hoe it to refresh the ground. The whole crop footprint must be prepared, including its corners.
Every bed remembers the family of its last crop. The Seed Belt shows it before you sow, with the weeds that sowing would bring, and the crop card says what grows well there next.
Weeds are judged once, when the seed goes in, and never spread afterwards. Sowing the same family again brings one level. Sowing into unturned stubble, over at least 50% of the crop's footprint, brings another, up to 2 levels. Hoeing the stubble first clears that part. Mulch over the whole footprint takes one level off, and you can pull the weeds once for each crop, for 3 Work. Trees start clean. A crop under heavy weeds still ripens and still harvests, but unless you pull them they take 1 from its harvest, never leaving less than one; light weeds cost only time. Mulch slows weeds without saving that harvest: only pulling does. The crop card's yield already counts the loss.
| Last crop | Grows well next |
|---|---|
| Grain | Beans or roots |
| Beans | Grain or tomato & potato |
| Tomato & potato | Beans or roots |
| Roots | Beans or grain |
| Fibre crops | Beans |
| Flowers | Beans |
Broad Beans feed the ground they grow in. A harvest gives 5 fertility back to the ground under it. Or dig a growing crop in as a cover crop, for 8 Work and no harvest: the ground under it gains 25 fertility and 30 organic matter. It has to reach its growing stage first, and the crop card asks you to confirm. Pulling up a seedling restores nothing.
The Broad Hoe can work a strip 4 m long and 2 m wide in one stroke. Turn on Wide strip in the Soil care dock; the strip runs the way you face. It costs the same Work as the ground it covers, and compost or mulch takes one dose for each 2 × 2 m of it. The ordinary stroke is still there for small jobs.
At the Skilled Farming rank (3,000 XP) you can sow and gather short rows. Turn on Sow a row in the Seed Belt and one click sows up to 4 seeds in a line away from you, each spot shown before you click. The row ends early at ground a single seed could not take. On a ready crop's card, Harvest row gathers up to 4 ready crops of the same kind of harvest in your line, within 6 m. If your satchel cannot hold the whole row, nothing is gathered. Each plant still costs its own Work.
At the Master Farming rank (15,000 XP) an Exceptional or Prize grade harvest of an annual crop also gives back 1 seed of that crop, when the satchel has room for it after the produce. Trees give no saplings. At the Artisan Farming rank (30,000 XP) Harvest row also picks ripe orchard trees down your line, within 14 m; each tree costs its own pick's Work and sets its fruit again, unless that was its last picking. At the Famed Farming rank (60,000 XP) a row pass covers 8 spots and reaches 2 times as far.
Stalks are cut with the sickle (Wheat, Barley, Flax and Sunflower). Roots are lifted (Potato and Carrot) and pods and fruit picked (Sweet Corn, Tomato and Broad Beans) by hand.
The climate of a plot matters as much as the seed. Match them, or accept slower growth.
Gives Harvested Wheat
Gives Harvested Barley
Gives Sweet Corn
Gives Plump Tomato
Gives Earthy Potato
Gives Crisp Carrot
Gives Broad Beans
Gives Flax Stalks
Gives Orchard Apple
Gives Sunflower Seed
Gives Sunreach Olive
Nothing matches. Clear a filter or try another word.
Growing time is for a plot with the right climate, damp soil, normal fertility and fair weather. 11 crops in all. Trees take longer, then keep giving: harvesting one starts its next cycle.
Every harvest comes in a grade. The grade depends on how well the crop matched its climate, how well watered and how fertile its soil was, your Farming rank, and a roll of luck. A higher grade sells for more and earns more Farming XP. Stacks of different grades never merge, so your satchel can hold Common and Prize wheat side by side.
A Harvest Apron raises the chance of a better grade.
Once you have finished the errand Water Where It Matters, a farm well can run a pump that waters every crop within 2.8 metres of the well in one go. It costs 120 gold to install, and each use costs 5 Work plus 1 for every crop it waters.
Mills, benches, tables and kitchens turn harvests and catches into bait, meals, tools and clothes. Every station, recipe and piece of gear.
Processing happens at fixed stations. Walk up, pick a recipe, and the job runs on the game clock while you do other things; collect the result when it is done. A job needs all its ingredients and all its Work up front.
Grinds harvested grain and seed into Ground Grain, the base of chum.
Mixes chum, ties lures, weaves linen and oiled canvas, and makes tools and clothing.
Cleans fish into scraps, then turns scraps into fertilizer, and cures sardines.
Raises bait worms from plant matter and a compost starter, or rots plant matter into garden compost for the soil.
Cooks the meals that give Work back. Each meal needs something you grew or caught, so shop goods alone never make one. Copper cookware, fitted once per kitchen, unlocks the bigger dishes.
Packs goods into trade packs for the villages. There are 5 packing yards, one in each village that packs.
37 recipes, from a handful of grain to oilskin coats. Times are real minutes at the normal game speed. The Work tier says how heavy the job is; the Work section has the exact cost of each tier and how rank and gear reduce it. Many recipes open with Processing XP.
| Recipe | Ingredients | Makes | Time | Work | Needs |
|---|---|---|---|---|---|
| Mill Wheat into Ground Grain Hand mill | 2 Harvested Wheat | 2 Ground Grain | 0.2 min | Light | Open from the start |
| Mill Barley into Ground Grain Hand mill | 2 Harvested Barley | 2 Ground Grain | 0.2 min | Light | Open from the start |
| Mix Chum Bucket Workbench | 2 Ground Grain, 2 Bait Worms | 2 Chum Bucket | 0.4 min | Prepared | Open from the start |
| Mix Rich Chum Blend Workbench | 3 Ground Grain, 3 Bait Worms | 1 Rich Chum Blend | 0.6 min | Prepared | 500 Processing XP |
| Mix Sinking Deep Chum Workbench | 2 Ground Grain, 2 Fish Scraps | 1 Sinking Deep Chum | 0.6 min | Prepared | 500 Processing XP |
| Tie Woven Lure Batch Workbench | 1 Flax Stalks, 1 Fish Scraps | 3 Woven Lure | 0.6 min | Prepared | 500 Processing XP |
| Twist a Woven Lure Workbench | 2 Plant Matter, 2 Bait Worms | 1 Woven Lure | 0.4 min | Prepared | Open from the start |
| Process Fish Scraps into Fertilizer Fish table | 3 Fish Scraps | 1 Fish Fertilizer | 0.4 min | Prepared | Open from the start |
| Render Fish Oil Fish table | 4 Fish Scraps | 1 Fish Oil | 0.8 min | Light | Open from the start |
| Cultivate Bait Worms Compost bin | 4 Plant Matter, 1 Compost Starter | 10 Bait Worms | 15 min | Standard | Open from the start |
| Make Garden Compost Compost bin | 3 Plant Matter | 2 Garden Compost | 10 min | Light | Open from the start |
| Clean Perch into Scraps Fish table | 1 River Perch | 2 Fish Scraps | 0.2 min | Light | Open from the start |
| Clean Mackerel into Scraps Fish table | 1 Atlantic Mackerel | 2 Fish Scraps | 0.2 min | Light | Open from the start |
| Clean Carp into Scraps Fish table | 1 Common Carp | 2 Fish Scraps | 0.2 min | Light | Open from the start |
| Mill Sunflower Seed into Ground Grain Hand mill | 2 Sunflower Seed | 2 Ground Grain | 0.2 min | Light | Open from the start |
| Salt-Cure Sardines Fish table | 2 Sunreach Sardine | 1 Salt-Cured Fish | 1.9 min | Prepared | 1,000 Processing XP (Apprentice) |
| Clean Sardines into Scraps Fish table | 1 Sunreach Sardine | 2 Fish Scraps | 0.2 min | Light | Open from the start |
| Weave Linen Roll Workbench | 3 Flax Stalks | 1 Linen Roll | 0.8 min | Standard | Open from the start |
| Oil Canvas Workbench | 1 Linen Roll, 2 Fish Scraps | 1 Oiled Canvas | 1.3 min | Standard | 1,000 Processing XP (Apprentice) |
| Sew Field Hat Workbench | 2 Linen Roll, 1 Tanned Leather | Field Hat | 1.7 min | Standard | Open from the start |
| Stitch Furrow Boots Workbench | 2 Tanned Leather, 1 Linen Roll | Furrow Boots | 2.1 min | Standard | Open from the start |
| Sew Tidewatch Cap Workbench | 2 Oiled Canvas, 1 Brass Fittings | Tidewatch Cap | 2.1 min | Standard | 1,000 Processing XP (Apprentice) |
| Sew Harvest Apron Workbench | 3 Linen Roll, 1 Tanned Leather | Harvest Apron | 2.5 min | Standard | 1,000 Processing XP (Apprentice) |
| Build Copper Rose Can Workbench | 2 Copper Sheet, 1 Brass Fittings, 1 Hardwood Blank | Copper Rose Can | 2.9 min | Masterwork | 1,000 Processing XP (Apprentice) |
| Forge Broad Hoe Workbench | 2 Tool Steel, 2 Hardwood Blank | Broad Hoe | 2.9 min | Masterwork | 1,000 Processing XP (Apprentice) |
| Forge Broad Sickle Workbench | 2 Tool Steel, 1 Hardwood Blank, 1 Tanned Leather | Broad Sickle | 2.9 min | Masterwork | 1,000 Processing XP (Apprentice) |
| Stitch Deck Boots Workbench | 2 Tanned Leather, 1 Oiled Canvas, 1 Brass Fittings | Deck Boots | 3.1 min | Masterwork | 3,000 Processing XP (Skilled) |
| Sew Oilskin Coat Workbench | 3 Oiled Canvas, 1 Brass Fittings | Oilskin Coat | 3.8 min | Masterwork | 7,500 Processing XP (Expert) |
| Build Long-Spout Can Workbench | 3 Copper Sheet, 2 Brass Fittings, 1 Hardwood Blank | Long-Spout Can | 3.8 min | Masterwork | 3,000 Processing XP (Skilled) |
| Forge Balanced Sickle Workbench | 2 Tool Steel, 1 Hardwood Blank, 1 Brass Fittings | Balanced Sickle | 3.8 min | Masterwork | 7,500 Processing XP (Expert) |
| Install Copper Cookware Kitchen | 4 Hardwood Blank, 3 Copper Sheet, 2 Tool Steel | Copper Cookware | 2.5 min | Standard | 500 Processing XP |
| Cook Harvest Bowl Kitchen | 3 Earthy Potato you grew, 3 Crisp Carrot, 2 Ground Grain | 1 Harvest Bowl | 0.8 min | Prepared | 250 Processing XP |
| Cook Broad Bean Bowl Kitchen | 4 Broad Beans, 2 Crisp Carrot, 2 Ground Grain | 1 Harvest Bowl | 0.8 min | Prepared | 250 Processing XP |
| Cook Harvest Bowl Batch Kitchen | 6 Earthy Potato you grew, 6 Crisp Carrot, 4 Ground Grain | 2 Harvest Bowl | 1.3 min | Standard | 15,000 Processing XP (Master), Copper Cookware fitted |
| Simmer Coastal Fish Stew Kitchen | 2 River Perch, 2 Earthy Potato, 2 Crisp Carrot, 1 Salt-Cured Fish | 1 Coastal Fish Stew | 1.3 min | Prepared | 750 Processing XP, Copper Cookware fitted |
| Simmer Coastal Stew Batch Kitchen | 4 River Perch, 4 Earthy Potato, 4 Crisp Carrot, 2 Salt-Cured Fish | 2 Coastal Fish Stew | 1.9 min | Standard | 30,000 Processing XP (Artisan), Copper Cookware fitted |
| Bake Orchard Tart Kitchen | 4 Orchard Apple you grew, 4 Ground Grain | 1 Orchard Tart | 1.5 min | Prepared | 1,500 Processing XP, Copper Cookware fitted |
Nothing matches. Clear a filter or try another word.
Trade packs are made at the packing yards and have their own table under Trade packs. A few recipes belong to the story and are left out here.
Gear is crafted at workshops and never bought. Each piece sits in one slot on the Character screen (C). Gear lowers Work costs but never below a floor, so it speeds you up rather than removing the cost of work.
No stat effect; it looks the part.
No stat effect; it looks the part.
No stat effect; it looks the part.
No stat effect; it looks the part.
No stat effect; it looks the part.
No stat effect; it looks the part.
No stat effect; it looks the part.
Nothing matches. Clear a filter or try another word.
Cast from the bank, hook the bite, fight the big ones. Rods, bait, a card for every fish, and how long a catch stays fresh.
There are two kinds of fish. Basic fish are quick to land: cast, hook the bite, and keep the fish inside the catch bar. Sport fish are real fights that need chum, an armed lure and the right rod.
Walk up to fishable water and press E to take out the rod. Press it again to start the power meter, and once more to cast. You can also left-click water.
Bait Worms shorten the wait for a bite.
Press Space when the fish bites. Hold to raise the catch bar and release to lower it; keep the fish inside the bar.
Keeping the fish in the bar the whole way is a perfect catch and gives extra Fishing XP.
Chum the school first, then arm a lure with R. In the fight, follow the highlighted response: W reels, S gives slack, and A / D swing the rod against the run. Press X twice to cut the line and end the fight.
Each hook uses one Woven Lure.
A sport fish is physical cargo. Keep it in a free hold slot or in your hands, collect it from the docked boat, and carry it to a village counter. See Boats and cargo.
Use ice to keep it fresh. Freshness.
Each rod is a step up the ladder: stronger reel, safer tension, and a larger class of fish it can land. Rods open with Fishing XP and are bought at harbor and village stalls, never crafted.
Worms are optional on a basic cast and shorten the wait. A sport fish needs a school that has been chummed, and a lure armed for the hook. Chum comes from grain you grow and mill yourself, which is the farm feeding the sea. See Recipes.
| Supply | What it is |
|---|---|
| Bait Worms | Optional basic-cast bait from rich compost. Shortens bite waits and favours rarer eligible fish; also used in chum. |
| Chum Bucket | Aromatic mix of ground grain and bait. Cast onto fish schools to trigger feeding frenzies. |
| Rich Chum Blend | A double-strength chum that holds a school feeding twice as long. The strong scent is cast first when several chums are in reach. |
| Sinking Deep Chum | Heavy chum weighted with scraps that sinks to the bottom feeders. Cast first when in reach; sinker species bite truer while its scent holds. |
| Woven Lure | A braided plant-fiber lure with a bright, scented core. Arm it before sport fishing; each hook uses one lure. |
15 species. Season, time of day and weather decide who bites; the rod class decides who you can land. Base value is the starting point for a sale; freshness, weight, grade and the counter's mood move it. How fish are priced.
Nothing matches. Clear a filter or try another word.
A sport fish starts at full freshness and loses it as the minutes pass. Freshness sets what it is worth, and a fish with none left is spoiled and cannot be sold.
| Freshness | Value |
|---|---|
| 90% or more | 100% |
| 75% to 89% | 95% |
| 50% to 74% | 80% |
| 25% to 49% | 55% |
| 1% to 24% | 30% |
| Spoiled (0%) | Cannot be sold |
In the journal, freshness reads as fresh from 85%, good from 60%, turning from 35%, and spoiled below that. Where the fish is kept changes how fast it ages:
| Where it is kept | Effect |
|---|---|
| In your hands or on the ground | Normal spoilage |
| A boat hold | Spoilage 20% slower |
| A farm crate | Spoilage 10% slower |
| Packed with crushed ice | Spoilage 60% slower |
| The harbor cold room | Spoilage 85% slower |
Hulls and holds, what a fish or a trade pack takes up, and the donkey, wagons and warehouses that move and keep it all.
Your boat is your fish hold, your delivery truck and your way across the sound. Step aboard at a berth, steer with W A S D, and dock when you arrive. An empty rowboat or skiff can be sent for from a serviced pier that berths it, for 10 or 40 gold; a rowboat cannot be sent to Sunreach, and a boat with cargo aboard has to be sailed home by you.
Fit it at a serviced berth for 450 gold once you have 3,000 Fishing XP (Skilled). While you are aboard it picks out live schools within 180 metres, names what is in them and marks them on your nautical chart.
Everything you carry fills a slot, and a slot has a size. A sport fish and a trade pack are physical loads: each takes a slot of its own and goes with you until you sell it.
| Fish size | Species | Wooden Rowboat | Coastal Fishing Skiff | Sunreach Trading Coaster |
|---|---|---|---|---|
| Small | Common Carp, Rainbow Trout, River Perch, Atlantic Mackerel, Sunreach Sardine, Golden Sea Bream | 2 | 6 | 10 |
| Medium | Channel Catfish, Northern Pike, Golden Arowana, Yellowfin Tuna, Greater Amberjack | 2 | 6 | 10 |
| Large | White Sturgeon, Pacific Sailfish, Broadbill Swordfish | 0 | 2 | 0 |
| Gargantuan | Blue Marlin | 0 | 2 | 0 |
Each cell is the number of bays on that boat that can take a fish of that size. The size of each fish is on its card in Every fish.
| Carrier | Bays | Needs |
|---|---|---|
| On your back, on foot or on the donkey | 1 pack | Starting gear |
| The starter horse carriage | 2 packs | Starting gear |
| Four-pack Wagon | 4 packs | 6,000 gold and 3,000 Trading XP (Skilled) |
| Six-pack Wagon | 6 packs | 30,000 gold and 15,000 Trading XP (Master) |
| Wooden Rowboat | 2 holds | The harbor errands in the main story |
| Coastal Fishing Skiff | 4 holds (2 iced), 2 external hooks | 850 gold and 7,500 Fishing XP (Expert) |
| Sunreach Trading Coaster | 10 holds | 200,000 gold and 30,000 Trading XP (Artisan) |
Your satchel holds 20 slots, so surplus goes into storage. Open Hold & Stores with L to see boat cargo, supplies and every container in reach at once.
| Place | Goods slots | Fish slots | Largest fish | Needs |
|---|---|---|---|---|
| Farm Crate | 8 | 2 | Medium | From the start |
| Home Chest | 20 | 0 | None | From the start |
| Farm Barn | 16 | 4 | Medium | 600 gold and 1,000 Processing XP (Apprentice) |
| Nevaland Warehouse | 24 | 8 | Large | 2,400 gold and 3,000 Trading XP (Skilled), after the Farm Barn |
| Harbor Cold Room | 8 | 6 | Gargantuan | Late in the main story |
Fish kept in a crate, barn or warehouse lose freshness 10% slower than in your hands; the harbor cold room slows it by 85%. Freshness has the figures.
How Work, gold and prices fit together, what each shop sells, every trade pack, a planner that prices a run, and the order board.
You grow and catch things, turn them into better goods, carry them to someone who wants them, and spend the gold on tools that open the next step.
Work you can store. Only hands-on jobs use it.
Work back per real hour of play from the trickle alone. Meals and chores add up to 150 more, and sleep 50 to 200.
Trade packs, made in 5 villages.
Fish species, 4 basic and 11 sport.
Planting, harvesting, crafting, packing and fishing cost Work. Walking, riding, sailing, carrying, selling and quests are free.
A shop charges about 25% over the going rate, and always more than any village would pay you for the same goods on its best day of the year. Profit comes from growing, catching, making from your own harvest or catch, or carrying goods somewhere better.
Distance, what the village wants this season, freshness, how well it knows you and how many you already sold there set the price. A fair day or a shortage pays more still.
The best trade pack earns about 26 gold per Work over bought ingredients, plus Trading XP, before the season, a fair or your standing raise it. The best sport fish, the Blue Marlin, averages about 25 after its lure and chum.
7% of the gold from a pack sold in another village or a carried fish sold at a counter. A pack handed in at a building site earns the same, priced at the village counter nearest the site. Near the village that packed it, that is a home sale and earns none. Contracts give about half their reward as XP.
Work is your energy for hands-on jobs. Each job has a fixed cost, paid in full. If you don't have enough, the job doesn't start and nothing is spent.
Cook meals from farm and sea ingredients at a kitchen; markets buy surplus but do not sell ready meals. Gold alone never cooks one: every recipe needs an ingredient no shop sells, and a shop crop has no harvest grade, so it does not count where a meal asks for one you grew (Harvest Bowl: Earthy Potato you grew, or Broad Beans; Orchard Tart: Orchard Apple you grew; Coastal Fish Stew: River Perch). The first Harvest Bowl needs no fitting. Stews, tarts and larger batches need copper cookware, fitted once at each kitchen: 4 Hardwood Blank, 3 Copper Sheet and 2 Tool Steel, 10 Work and 2.5 real minutes, from 500 Processing XP.
Meals and chores share a limit of 225 Work and 3 meals every 90 min of real time. A meal or chore gives its whole Work or nothing: it waits while that limit, or the room left under 750, is smaller than what it gives. Fishing gives no Work back: a cast or a hook is paid once, whatever comes of it. Nothing builds up past 750.
Hoe ground before sowing. A patch supports 3 annual harvests before it needs loosening again; partial strokes pay only for changed ground. Fish fertilizer feeds the selected patch once per crop: fed ground takes no more until the crop on it is harvested. Garden compost, made from plant matter at the farm bin, enriches it and helps it hold water; plant matter laid as mulch slows its drying. Beans dug in while growing give no harvest but feed the ground far more than a bean harvest does. A patch that would gain nothing from a dose spends nothing. Watering by hand remains free.
Each skill rank above Novice cuts that skill's Work by 5%, up to 35%. Savings are exact: a job charges whole Work and what it overpaid comes off the next job, so 20 3-Work jobs at Apprentice cost 57 Work, not 60. Gear trims more: Field Hat −15% on planting and fertilizing; Tidewatch Cap −10% on casts and hooks; Balanced Sickle −20% on harvesting. Gear never takes a job below 80% of its rank price.
Gear is crafted at workshops, never bought. Other gear helps you earn: Broad Hoe works a 4 m strip per stroke, one dose per 4 m² fed; Harvest Apron ×1.1 odds of an exceptional or prize crop; Oilskin Coat −10% line damage; Furrow Boots +0.25 m reach; Deck Boots +10% bracing; Long-Spout Can +0.5 m reach; Broad Sickle +1 plant matter from each annual harvest.
Lowest and highest crop, basic fish and sport fish. Crops: average harvest on ordinary ground (fertility 30–79) for planting, harvesting and one starter patch shared across 3 annual harvests (orchards: each of a tree's 5 pickings, which costs more Work than an annual harvest). Seed and sapling prices (a tree is spent after its last picking and is replanted), initial orchard preparation and optional fertilizer or pump use are additional costs. Fish: worth averaged over the weight and grade a catch lands at, as in Fishing, per cast or hook, after a sport fish's lure and chum. Packs also need travel.
Every shop has limited stock and its own mood. Selling a lot makes prices drop; buying a lot makes them rise. Each game hour (2.5 real minutes) the town slowly sets them back.
A pier calls your skiff once you own it; until then it calls your rowboat. Sunreach never calls a rowboat. There is no rent or tax. The running costs are the supplies you use up and repairs, which cost a share of the full price for the damage done. At the helm in a storm, a gust you ride out mends one step of hull damage for free, and one you lose costs a step. Only the Coastal Fishing Skiff burns fuel: one can fills the tank, which lasts about 10 real minutes at full throttle.
A crop's grade comes from how well it suits the climate, how wet it was kept while growing (the crop card shows the odds), the soil's fertility, your Farming XP and a little luck. Healthy crops, fertile ground and more Farming XP also yield more: ground below 30 fertility gives only a crop's least, and ground at 80 or more never less than the middle of its range. A basic fish's grade comes from the cast; a sport fish's is rolled when you land it.
A shop charges about 25% over the going rate, and never less than the most any village would pay you for the same goods on its best day of the year. Workshop supplies (Flax Stalks, Linen Roll and Fish Scraps) add no markup of their own, but the same floor holds, so spinning bought flax into linen loses on an ordinary day. Work meals must be cooked at a kitchen; markets buy your surplus. Buying goods in one village and selling them in another always loses. Not even across seasons: no stored good sells in one season for more than a shop charges in another. Turning your own harvest or catch into something new, or packing goods for a far village, is what pays.
Each season raises or lowers what shops pay and charge for some goods, from ×0.80 to ×1.40. Fish and crops follow their seasons at the shops. Trade packs follow what the coast wants each season instead (see Trade runs). The prices on this page are spring prices.
| Goods | Where | Spring | Summer | Autumn | Winter |
|---|---|---|---|---|---|
| Plump Tomato | Nevaland, Sunreach and Reedhaven | – | ×0.80 | – | ×1.40 |
| Plump Tomato | Pinewatch | ×1.15 | ×1.10 | ×1.20 | ×1.40 |
| Plump Tomato | Highridge | ×1.20 | ×1.15 | ×1.30 | ×1.40 |
| Blue Marlin | Nevaland | – | ×1.35 | – | – |
| Blue Marlin | Highridge | ×1.20 | ×1.25 | ×1.30 | ×1.35 |
| Blue Marlin | Reedhaven | ×1.15 | ×1.20 | ×1.20 | ×1.25 |
| Blue Marlin | Pinewatch | ×1.10 | ×1.15 | ×1.15 | ×1.20 |
| Broadbill Swordfish | Highridge | ×1.20 | ×1.25 | ×1.30 | ×1.35 |
| Broadbill Swordfish | Nevaland | – | – | ×1.30 | ×1.20 |
| Broadbill Swordfish | Reedhaven | ×1.15 | ×1.20 | ×1.20 | ×1.25 |
| Broadbill Swordfish | Pinewatch | ×1.10 | ×1.15 | ×1.15 | ×1.20 |
| Channel Catfish | Highridge | ×1.20 | ×1.25 | ×1.30 | ×1.35 |
| Channel Catfish | Pinewatch | ×1.10 | ×1.15 | ×1.15 | ×1.20 |
| Channel Catfish | Nevaland | – | ×1.15 | – | – |
| Channel Catfish | Reedhaven | ×0.95 | – | ×0.95 | ×1.05 |
| Golden Arowana | Highridge | ×1.20 | ×1.25 | ×1.30 | ×1.35 |
| Golden Arowana | Nevaland | – | ×1.30 | – | – |
| Golden Arowana | Pinewatch | ×1.10 | ×1.15 | ×1.15 | ×1.20 |
| Golden Arowana | Reedhaven | ×0.95 | – | ×0.95 | ×1.05 |
| Golden Sea Bream | Highridge | ×1.20 | ×1.25 | ×1.30 | ×1.35 |
| Golden Sea Bream | Reedhaven | ×1.15 | ×1.20 | ×1.20 | ×1.25 |
| Golden Sea Bream | Pinewatch | ×1.10 | ×1.15 | ×1.15 | ×1.20 |
| Golden Sea Bream | Nevaland and Sunreach | – | ×1.05 | – | – |
| Greater Amberjack | Highridge | ×1.20 | ×1.25 | ×1.30 | ×1.35 |
| Greater Amberjack | Reedhaven | ×1.15 | ×1.20 | ×1.20 | ×1.25 |
| Greater Amberjack | Nevaland and Sunreach | – | ×1.20 | ×1.10 | – |
| Greater Amberjack | Pinewatch | ×1.10 | ×1.15 | ×1.15 | ×1.20 |
| Northern Pike | Highridge | ×1.20 | ×1.25 | ×1.30 | ×1.35 |
| Northern Pike | Nevaland | – | – | ×1.20 | – |
| Northern Pike | Pinewatch | ×1.10 | ×1.15 | ×1.15 | ×1.20 |
| Northern Pike | Reedhaven | ×0.95 | – | ×0.95 | ×1.05 |
| Pacific Sailfish | Highridge | ×1.20 | ×1.25 | ×1.30 | ×1.35 |
| Pacific Sailfish | Nevaland and Sunreach | – | ×1.25 | – | – |
| Pacific Sailfish | Reedhaven | ×1.15 | ×1.20 | ×1.20 | ×1.25 |
| Pacific Sailfish | Pinewatch | ×1.10 | ×1.15 | ×1.15 | ×1.20 |
| Rainbow Trout | Highridge | ×1.20 | ×1.25 | ×1.30 | ×1.35 |
| Rainbow Trout | Nevaland | – | – | – | ×1.20 |
| Rainbow Trout | Pinewatch | ×1.10 | ×1.15 | ×1.15 | ×1.20 |
| Rainbow Trout | Reedhaven | ×0.95 | – | ×0.95 | ×1.05 |
| Salt-Cured Fish | Highridge | ×1.20 | ×1.15 | ×1.25 | ×1.35 |
| Salt-Cured Fish | Pinewatch | ×1.15 | ×1.10 | ×1.15 | ×1.30 |
| Salt-Cured Fish | Nevaland and Reedhaven | – | ×0.90 | – | ×1.25 |
| Sweet Corn | Highridge | ×1.20 | ×1.15 | ×1.25 | ×1.35 |
| Sweet Corn | Nevaland, Sunreach, Pinewatch and Reedhaven | – | ×0.85 | – | ×1.30 |
| White Sturgeon | Highridge | ×1.20 | ×1.25 | ×1.30 | ×1.35 |
| White Sturgeon | Nevaland | – | – | – | ×1.30 |
| White Sturgeon | Pinewatch | ×1.10 | ×1.15 | ×1.15 | ×1.20 |
| White Sturgeon | Reedhaven | ×0.95 | – | ×0.95 | ×1.05 |
| Yellowfin Tuna | Highridge | ×1.20 | ×1.25 | ×1.30 | ×1.35 |
| Yellowfin Tuna | Reedhaven | ×1.15 | ×1.20 | ×1.20 | ×1.25 |
| Yellowfin Tuna | Nevaland and Sunreach | – | ×1.20 | ×1.10 | – |
| Yellowfin Tuna | Pinewatch | ×1.10 | ×1.15 | ×1.15 | ×1.20 |
| Crushed Ice | everywhere | – | ×1.30 | – | – |
| Orchard Apple | Nevaland, Sunreach, Pinewatch and Highridge | ×1.30 | – | ×0.80 | – |
| Orchard Apple | Reedhaven | ×1.30 | ×1.20 | ×1.05 | ×1.25 |
| Sunreach Olive | Highridge | ×1.20 | ×1.25 | ×1.20 | ×1.30 |
| Sunreach Olive | Nevaland, Pinewatch and Reedhaven | ×1.10 | – | – | ×1.20 |
| Sunreach Olive | Sunreach | ×1.15 | – | ×0.90 | – |
| Atlantic Mackerel | everywhere | – | ×0.90 | – | ×1.25 |
| Earthy Potato | Pinewatch | ×1.10 | ×1.10 | ×1.05 | ×1.25 |
| Earthy Potato | Nevaland, Sunreach, Reedhaven and Highridge | ×1.15 | – | – | ×1.10 |
| Fish Fertilizer | everywhere | ×1.25 | – | – | – |
| Harvested Wheat | Pinewatch | ×1.12 | ×1.15 | – | ×1.25 |
| Harvested Wheat | Reedhaven | ×1.15 | ×1.20 | ×1.10 | ×1.25 |
| Harvested Wheat | Nevaland, Sunreach and Highridge | – | – | ×0.90 | ×1.20 |
| Sunflower Seed | everywhere | – | ×0.90 | – | ×1.25 |
| Ground Grain | everywhere | – | – | ×0.90 | ×1.20 |
| Harvested Barley | everywhere | – | – | ×0.90 | ×1.20 |
| Broad Beans | everywhere | – | ×0.90 | – | ×1.15 |
| Broad Bean Seeds | everywhere | ×1.10 | – | – | – |
| Common Carp | everywhere | ×1.10 | – | – | – |
| Crisp Carrot | everywhere | – | – | ×0.90 | ×1.10 |
| Fish Oil | everywhere | – | – | – | ×1.10 |
| Flax Stalks | everywhere | ×1.10 | – | – | – |
| Garden Compost | everywhere | ×1.10 | – | – | – |
| Plant Matter | everywhere | ×1.10 | – | – | – |
| Woven Lure | everywhere | – | ×1.10 | – | – |
| Olive Sapling | everywhere | – | – | ×0.95 | – |
| Sunflower Seeds | everywhere | ×1.05 | – | – | – |
Each village shop stocks its own goods. Prices move with demand and the season, and a shop sells at a markup over what it would pay you. Stock is limited, so buying a lot raises the price. The money section explains the markup and the daily reset.
Nothing matches. Clear a filter or try another word.
Each village packs its own goods into crates. A crate is worth the most in a far village that wants that kind of goods, delivered fresh, before you flood that buyer.
Ingredients at their base value plus fee, plus 15%, 45% or 60% by tier (harvest, crafted, premium), and 80% for a village's house pack, raised by the grade of what you pack (the crop grade prices in Money). Locked in when you start packing.
+75% per km of road or sea. The longest route pays ×2.5.
Each village wants some kinds more: ×0.85 to ×1.25.
Full price at 90%+, down to ×0.30 when nearly spoiled.
Each pack of the same kind lowers the next price. Buyers recover on the game clock: about 1 packs' worth per real hour of play, and 0.7 over a night's sleep.
The coast's wants turn with the seasons, each village holds a fair, somebody always runs short, and every village remembers who keeps bringing goods. None of it is random to the day: the news board tells you what's coming.
| Kind of goods | Spring | Summer | Autumn | Winter |
|---|---|---|---|---|
| provisions | −5% | −5% | — | +15% |
| textiles | −10% | — | +15% | +5% |
| workshop | +15% | −5% | — | −10% |
| maritime | — | +15% | −10% | −10% |
Every village except the one that packed it pays this on top of what it always wants. The journal's calendar also flags each fish or crop a counter pays ×1.20 or more for in its season.
On its fair a village pays 35% more for one kind of goods, and the trust those packs earn doubles. The news board posts a fair 6 days ahead.
Every day one village runs short of one kind of goods and pays 20% more for it. Each counter's news board says what it hears; your Trading rank decides how far ahead and how sharp:
| Standing | Trust | Pack price | Shelf price | Bidding tithe |
|---|---|---|---|---|
| Stranger | 0 | — | — | 10% |
| Known | 30 | +2% | — | 10% |
| Regular | 90 | +4% | −3% | 10% |
| Trusted | 200 | +6% | −5% | 10% |
| Honoured | 400 | +8% | −8% | 0% |
Trust grows with what you bring: 2 / 4 / 8 for a harvest / crafted / premium pack carried in (×1.5 at 90%+ freshness, ×2 on that village's fair); 2 for a sport fish sold there, 3 for a bell sale, 3 more for a new board record and 6 for a filled order. A pack that sells for less than 50% of its fresh price at even demand earns none. Trust never falls. A village's own house pack opens at Trusted (200 trust): Millhouse Flour Chest (Nevaland), Weaver's Bolt Chest (Pinewatch), Saltmarsh Cure Barrels (Reedhaven), Highridge Ironwork Crate (Highridge) and Terrace Olive Crate (Sunreach).
At the counters of Nevaland, Pinewatch, Reedhaven, Highridge and Sunreach you can ring the bell and let the village bid on a carried exceptional or trophy fish, or one heavier than that village's board. Once a day per village.
Every village board starts with an old mark for each fish, 25%–55% of the way from its average weight to its heaviest. A Blue Marlin's mark never tops the harbor's standing row, 212.4 kg. Beat a board and your name goes up, with extra trust, once a day for each kind of fish: a heavier one later that day moves your mark but earns no more.
The journal's Accounts page keeps the last 7 days of gold in and out by kind, each day's best sale, where you stand with every village and the coast's calendar. At the counter, every pack price shows its reasons: season, fair, shortage and standing.
Keepers remark on a fair-day sale, a bell sale, a new record, a new standing or any sale of 1,000 G or more.
Collecting a pack gives 15 / 25 / 35 Processing XP. One pack per yard at a time.
Freshness lost per real minute in the open at 20 °C. A pack spoils at the value-weighted mix of what's inside. Boat holds, ice and the harbor cold room slow it down.
| Pack | Size | Made in | Best buyer | Gold | Trading XP | Profit* | Work | Spoils |
|---|---|---|---|---|---|---|---|---|
| Olive Tree Trade Pack | harvest | Sunreach | Highridge | 784 | 54 | +423 | 35 | fast |
| Flax Trade Pack | harvest | Pinewatch | Sunreach | 492 | 34 | +255 | 35 | never |
| Sunflower Trade Pack | harvest | Sunreach | Highridge | 474 | 33 | +251 | 35 | slowly |
| Potato Trade Pack | harvest | Highridge | Sunreach | 324 | 22 | +146 | 35 | fast |
| Sweet Corn Trade Pack | harvest | Reedhaven | Sunreach | 395 | 27 | +145 | 35 | fast |
| Barley Trade Pack | harvest | Highridge | Sunreach | 298 | 20 | +133 | 35 | slowly |
| Apple Tree Trade Pack | harvest | Pinewatch | Sunreach | 385 | 26 | +123 | 35 | fast |
| Carrot Trade Pack | harvest | Reedhaven | Sunreach | 261 | 18 | +117 | 35 | fast |
| Wheat Trade Pack | harvest | Nevaland | Sunreach | 193 | 13 | +55 | 35 | slowly |
| Tomato Trade Pack | harvest | Nevaland | Sunreach | 280 | 19 | +51 | 35 | fast |
| Cured Coastal Fish Crate | crafted | Sunreach | Highridge | 1,339 | 93 | +860 | 60 | moderately |
| Workshop Metal Crate | crafted | Highridge | Sunreach | 1,228 | 85 | +846 | 60 | never |
| Island Pantry Pack | crafted | Sunreach | Highridge | 1,273 | 89 | +837 | 60 | moderately |
| Field Tool Materials | crafted | Highridge | Sunreach | 1,085 | 75 | +763 | 60 | never |
| Linen Bale | crafted | Pinewatch | Sunreach | 937 | 65 | +621 | 60 | never |
| Seasoned Timber Bundle | crafted | Pinewatch | Sunreach | 894 | 62 | +606 | 60 | never |
| Preserved River Provisions | crafted | Reedhaven | Sunreach | 848 | 59 | +446 | 60 | moderately |
| Angler Supply Crate | crafted | Reedhaven | Sunreach | 462 | 32 | +301 | 60 | slowly |
| Milled Grain Sacks | crafted | Nevaland | Sunreach | 572 | 40 | +280 | 60 | slowly |
| Harvest Provisions | crafted | Nevaland | Sunreach | 597 | 41 | +260 | 60 | moderately |
| Highridge Ironwork Crate | premium | Highridge | Sunreach | 3,367 | 235 | +2,515 | 95 | never |
| Terrace Olive Crate | premium | Sunreach | Highridge | 3,227 | 225 | +2,362 | 95 | moderately |
| Sunreach Export Hamper | premium | Sunreach | Highridge | 3,364 | 235 | +2,306 | 95 | moderately |
| Reinforced Fittings Chest | premium | Highridge | Sunreach | 3,117 | 218 | +2,264 | 95 | never |
| Coastal Rigging Chest | premium | Sunreach | Highridge | 3,175 | 222 | +2,242 | 95 | slowly |
| Weaver's Bolt Chest | premium | Pinewatch | Sunreach | 2,552 | 178 | +1,857 | 95 | never |
| Saltmarsh Cure Barrels | premium | Reedhaven | Sunreach | 2,607 | 182 | +1,790 | 95 | slowly |
| Woodland Outfitter Chest | premium | Pinewatch | Sunreach | 2,552 | 178 | +1,758 | 95 | slowly |
| Weatherproof Supplies | premium | Pinewatch | Sunreach | 2,377 | 166 | +1,657 | 95 | never |
| Highland Harvest Chest | premium | Highridge | Sunreach | 2,448 | 171 | +1,497 | 95 | moderately |
| River Expedition Supplies | premium | Reedhaven | Sunreach | 2,187 | 153 | +1,489 | 95 | slowly |
| Marsh Pantry Hamper | premium | Reedhaven | Sunreach | 2,127 | 148 | +1,273 | 95 | moderately |
| Voyage Provisions Chest | premium | Nevaland | Sunreach | 1,994 | 139 | +1,140 | 95 | slowly |
| Millhouse Flour Chest | premium | Nevaland | Sunreach | 1,587 | 111 | +946 | 95 | slowly |
| Village Feast Hamper | premium | Nevaland | Sunreach | 2,758 | 193 | n/a | 95 | fast |
* Profit over buying every ingredient plus the fee. Fresh pack, none sold there yet, no daily drift, on an ordinary day before the season's wants and your standing.
35 packs, packed at a village's packing yard. What a pack sells for depends on where you carry it, so the price is in the planner above rather than a table here. The fee is paid in gold when you pack, and the time is real minutes at the normal game speed. Cargo and carriers says how many packs each carrier takes.
| Pack | Village | Grade | Ingredients | Fee | Time | Needs |
|---|---|---|---|---|---|---|
| Wheat Trade Pack | Nevaland Village | Harvest, provisions | 10 Harvested Wheat | 8 | 3 min | From the start |
| Barley Trade Pack | Highridge | Harvest, provisions | 10 Harvested Barley | 8 | 3 min | From the start |
| Sweet Corn Trade Pack | Reedhaven | Harvest, provisions | 10 Sweet Corn | 8 | 3 min | From the start |
| Tomato Trade Pack | Nevaland Village | Harvest, provisions | 10 Plump Tomato | 8 | 3 min | From the start |
| Potato Trade Pack | Highridge | Harvest, provisions | 10 Earthy Potato | 8 | 3 min | From the start |
| Carrot Trade Pack | Reedhaven | Harvest, provisions | 10 Crisp Carrot | 8 | 3 min | From the start |
| Flax Trade Pack | Pinewatch | Harvest, textiles | 10 Flax Stalks | 8 | 3 min | From the start |
| Apple Tree Trade Pack | Pinewatch | Harvest, provisions | 10 Orchard Apple | 8 | 3 min | From the start |
| Sunflower Trade Pack | Sunreach Cove | Harvest, provisions | 10 Sunflower Seed | 8 | 3 min | From the start |
| Olive Tree Trade Pack | Sunreach Cove | Harvest, provisions | 10 Sunreach Olive | 8 | 3 min | From the start |
| Milled Grain Sacks | Nevaland Village | Crafted, provisions | 8 Ground Grain, 4 Harvested Wheat, 1 Linen Roll | 25 | 4 min | 1,000 Processing XP (Apprentice) |
| Harvest Provisions | Nevaland Village | Crafted, provisions | 8 Plump Tomato, 6 Harvested Wheat, 2 Hardwood Blank | 25 | 4 min | 1,000 Processing XP (Apprentice) |
| Village Feast Hamper | Nevaland Village | Premium, provisions | 4 Harvest Bowl, 3 Orchard Tart, 4 Sunreach Olive, 2 Linen Roll | 75 | 5 min | 3,000 Processing XP (Skilled), 3,000 Trading XP (Skilled) |
| Voyage Provisions Chest | Nevaland Village | Premium, maritime | 10 Ground Grain, 6 Salt-Cured Fish, 2 Oiled Canvas, 2 Hardwood Blank | 75 | 5 min | 3,000 Processing XP (Skilled), 3,000 Trading XP (Skilled) |
| Seasoned Timber Bundle | Pinewatch | Crafted, workshop | 6 Hardwood Blank, 2 Tanned Leather | 25 | 4 min | 1,000 Processing XP (Apprentice) |
| Linen Bale | Pinewatch | Crafted, textiles | 3 Linen Roll, 4 Flax Stalks | 25 | 4 min | 1,000 Processing XP (Apprentice) |
| Weatherproof Supplies | Pinewatch | Premium, textiles | 3 Oiled Canvas, 3 Linen Roll, 3 Brass Fittings | 75 | 5 min | 3,000 Processing XP (Skilled), 3,000 Trading XP (Skilled) |
| Woodland Outfitter Chest | Pinewatch | Premium, workshop | 8 Hardwood Blank, 4 Tool Steel, 3 Tanned Leather, 4 Orchard Apple | 75 | 5 min | 3,000 Processing XP (Skilled), 3,000 Trading XP (Skilled) |
| Angler Supply Crate | Reedhaven | Crafted, maritime | 10 Bait Worms, 4 Woven Lure, 2 Hardwood Blank | 25 | 4 min | 1,000 Processing XP (Apprentice) |
| Preserved River Provisions | Reedhaven | Crafted, provisions | 4 Salt-Cured Fish, 4 Sweet Corn, 4 Crisp Carrot | 25 | 4 min | 1,000 Processing XP (Apprentice) |
| River Expedition Supplies | Reedhaven | Premium, maritime | 5 Rich Chum Blend, 5 Woven Lure, 2 Oiled Canvas, 3 Hardwood Blank | 75 | 5 min | 3,000 Processing XP (Skilled), 3,000 Trading XP (Skilled) |
| Marsh Pantry Hamper | Reedhaven | Premium, provisions | 6 Salt-Cured Fish, 8 Ground Grain, 6 Orchard Apple, 2 Linen Roll | 75 | 5 min | 3,000 Processing XP (Skilled), 3,000 Trading XP (Skilled) |
| Workshop Metal Crate | Highridge | Crafted, workshop | 3 Tool Steel, 2 Copper Sheet, 2 Hardwood Blank | 25 | 4 min | 1,000 Processing XP (Apprentice) |
| Field Tool Materials | Highridge | Crafted, workshop | 2 Tool Steel, 3 Hardwood Blank, 2 Tanned Leather | 25 | 4 min | 1,000 Processing XP (Apprentice) |
| Reinforced Fittings Chest | Highridge | Premium, workshop | 5 Brass Fittings, 4 Tool Steel, 2 Oiled Canvas, 2 Hardwood Blank | 75 | 5 min | 3,000 Processing XP (Skilled), 3,000 Trading XP (Skilled) |
| Highland Harvest Chest | Highridge | Premium, provisions | 12 Harvested Barley, 12 Earthy Potato, 6 Salt-Cured Fish, 2 Linen Roll | 75 | 5 min | 3,000 Processing XP (Skilled), 3,000 Trading XP (Skilled) |
| Cured Coastal Fish Crate | Sunreach Cove | Crafted, provisions | 5 Salt-Cured Fish, 3 Sunreach Olive, 2 Hardwood Blank | 25 | 4 min | 1,000 Processing XP (Apprentice) |
| Island Pantry Pack | Sunreach Cove | Crafted, provisions | 8 Sunflower Seed, 5 Sunreach Olive, 1 Linen Roll | 25 | 4 min | 1,000 Processing XP (Apprentice) |
| Sunreach Export Hamper | Sunreach Cove | Premium, provisions | 10 Sunreach Olive, 6 Salt-Cured Fish, 8 Ground Grain, 2 Linen Roll | 75 | 5 min | 3,000 Processing XP (Skilled), 3,000 Trading XP (Skilled) |
| Coastal Rigging Chest | Sunreach Cove | Premium, maritime | 4 Oiled Canvas, 4 Brass Fittings, 2 Linen Roll, 6 Sunflower Seed | 75 | 5 min | 3,000 Processing XP (Skilled), 3,000 Trading XP (Skilled) |
| Millhouse Flour Chest House pack | Nevaland Village | Premium, provisions | 14 Ground Grain, 8 Harvested Wheat, 2 Linen Roll, 2 Hardwood Blank | 75 | 5 min | 3,000 Processing XP (Skilled), 3,000 Trading XP (Skilled), Trusted standing in Nevaland Village |
| Weaver's Bolt Chest House pack | Pinewatch | Premium, textiles | 5 Linen Roll, 6 Flax Stalks, 2 Tanned Leather, 2 Hardwood Blank | 75 | 5 min | 3,000 Processing XP (Skilled), 3,000 Trading XP (Skilled), Trusted standing in Pinewatch |
| Saltmarsh Cure Barrels House pack | Reedhaven | Premium, maritime | 8 Salt-Cured Fish, 12 Bait Worms, 2 Oiled Canvas, 2 Hardwood Blank | 75 | 5 min | 3,000 Processing XP (Skilled), 3,000 Trading XP (Skilled), Trusted standing in Reedhaven |
| Highridge Ironwork Crate House pack | Highridge | Premium, workshop | 6 Tool Steel, 3 Copper Sheet, 3 Brass Fittings, 2 Hardwood Blank | 75 | 5 min | 3,000 Processing XP (Skilled), 3,000 Trading XP (Skilled), Trusted standing in Highridge |
| Terrace Olive Crate House pack | Sunreach Cove | Premium, provisions | 12 Sunreach Olive, 8 Sunflower Seed, 2 Linen Roll, 2 Hardwood Blank | 75 | 5 min | 3,000 Processing XP (Skilled), 3,000 Trading XP (Skilled), Trusted standing in Sunreach Cove |
Nothing matches. Clear a filter or try another word.
Harvest packs are crops of one kind and open from the start. Crafted packs are made from goods out of your workshops and need Processing XP. Premium packs need Trading XP as well. A house pack also needs the village to trust you.
Basic fishing is a quick cast for everyday fish. Sport fishing is a fight with a fish from a school, and every sport catch is cargo you carry to a counter before it spoils.
Charge the cast, hook the fish, then keep it inside the green bar. A weaker cast lands a common fish. Worms cut the bite wait by 40% and make each rarer fish 2× as likely to bite. Treasure holds bait worms, wheat seeds or carrot seeds, sometimes with fish fertilizer. Stackable catches go to your satchel; physical catches must be carried.
Keep the fish: it goes in your hold and you get 35% of its Fishing XP now, and the rest when you sell it, fill an order with it, ring the bell for it or put it in the cold room. Release it: 35% of the XP and no more. Release or scrap a kept fish later and the rest is lost. The hook's Work is spent either way, and a lost fight gives nothing. Your rod and your hold decide how big a fish you can keep.
| Fish | Type | Rod | Where | When | Value | Work | Gold / Work | Fishing XP |
|---|---|---|---|---|---|---|---|---|
| Sunreach Sardine | basic | willow | Sunreach coast | all year | 23 G | 10 | 2.3 | 25 |
| River Perch | basic | willow | river | all year | 29 G | 10 | 2.9 | 25 |
| Atlantic Mackerel | basic | willow | coast | all year | 35 G | 10 | 3.5 | 25 |
| Rainbow Trout | sport | willow | river, lake | all year | 64 G | 10 | 4.7 | 105 |
| Common Carp | basic | willow | river, lake | all year | 68 G | 10 | 6.8 | 25 |
| Golden Sea Bream | sport, boat required | willow | Sunreach coast | all year | 71 G | 10 | 5.4 | 110 |
| Channel Catfish | sport | river | river, lake | summer, autumn | 97 G | 12 | 6.6 | 128 |
| Northern Pike | sport | river | lake | autumn to spring | 116 G | 12 | 8.2 | 141 |
| Yellowfin Tuna | sport | heavy sport | coast, offshore, Sunreach | summer, autumn | 204 G | 12 | 15.6 | 204 |
| Greater Amberjack | sport | heavy sport | Sunreach coast, offshore | summer, autumn | 223 G | 12 | 17.1 | 218 |
| Golden Arowana | sport | heavy sport | lake | summer | 280 G | 12 | 21.9 | 258 |
| White Sturgeon | sport | heavy sport | coast | autumn to spring | 308 G | 15 | 19.4 | 276 |
| Pacific Sailfish | sport | offshore | offshore, Sunreach | summer | 357 G | 15 | 22.6 | 312 |
| Broadbill Swordfish | sport | offshore | offshore | autumn, winter | 384 G | 15 | 24.4 | 330 |
| Blue Marlin | sport | master | offshore | summer, autumn | 511 G | 20 | 24.7 | 420 |
Value is a catch's worth averaged over the weight and grade it lands at: a sport fish by its landing roll, a basic fish at a full-power cast landed perfectly (a weaker cast lands a lower grade). Fresh, at an ordinary market mood with no season; many fish pay more in their season (see Seasons move prices in Money). Gold / Work is per cast or hook, and a sport fish's also pays for its lure (11 G) and its share of a 19 G chum, which holds a school of 3. A lost fight earns nothing. Fishing XP is for a common catch of average weight. Heavier fish are worth up to 2.5× more. Carried fish also give 7% of their sale as Trading XP.
At 0% it can't be sold. Pausing or closing the game stops spoilage. Sleeping and towing do not: cargo spoils through the skipped hours as if you had played them, so a night's sleep (18:00 to 08:00) costs cargo as much as 35 real minutes of play. Store fish cold before you turn in; the bed warns you when something you carry would lose freshness overnight.
One ice pack cools for 15 min of play. Heat speeds spoilage up (×1.5 at 30 °C); cold slows it, down to ×0.6.
Every counter keeps a board. An order names a counter, a good, a quantity and a time limit, and pays a multiple of the market price when you deliver in time. How many can be open at once grows with your Trading rank, which Ranks lays out. Which orders get posted at a time varies; this is the full book they are drawn from. 16 later orders, which open with the late game, are not listed.
| Order | Counter | Wants | Qty | Time limit | Pays | Needs |
|---|---|---|---|---|---|---|
| Pinewatch Baker Produce order | Pinewatch | Harvested Wheat | 6 to 12 | 30 min | 1.35× | From the start |
| Highridge Tavern Keeper Produce order | Highridge | Plump Tomato | 5 to 10 | 40 min | 1.5× | 1,000 Farming XP (Apprentice) |
| Harbor Innkeeper Fresh fish order | Nevaland Harbor | Rainbow Trout 80% fresh or better | 2 to 4 | 20 min | 1.6× | From the start |
| Wholesale Fish Buyer Fresh fish order | Nevaland Harbor | Yellowfin Tuna fine quality or better, 75% fresh or better | 2 to 3 | 60 min | 1.75× | 3,000 Trading XP (Skilled) |
| Harbor Records Keeper Trophy order | Nevaland Harbor | Blue Marlin exceptional quality or better, 70% fresh or better, 120 to 250 kg | 1 | 2 h | 2.5× | 15,000 Fishing XP (Master) |
| Village Cellarer Produce order | Nevaland Village | Earthy Potato | 8 to 14 | 30 min | 1.3× | From the start |
| Market Greengrocer Produce order | Nevaland Village | Crisp Carrot | 6 to 10 | 30 min | 1.4× | 200 Farming XP |
| Village Brewer Produce order | Nevaland Village | Harvested Barley | 6 to 12 | 40 min | 1.4× | 500 Farming XP |
| Harbor Provisioner Produce order | Nevaland Village | Sweet Corn | 5 to 9 | 40 min | 1.5× | 1,000 Farming XP (Apprentice) |
| Sailmaker Produce order | Reedhaven | Flax Stalks | 4 to 8 | 60 min | 1.6× | 3,000 Farming XP (Skilled) |
| Village Baker Produce order | Nevaland Village | Orchard Apple | 5 to 9 | 60 min | 1.6× | 7,500 Farming XP (Expert) |
| Reedhaven Stores Keeper Bulk order | Reedhaven | Harvested Wheat | 20 to 30 | 2 h | 1.55× | 1,000 Trading XP (Apprentice) |
| Winter Stores Keeper Bulk order | Nevaland Village | Earthy Potato | 18 to 26 | 2 h | 1.5× | 1,000 Trading XP (Apprentice) |
| Ines Bulk order | Sunreach Cove | Plump Tomato | 16 to 24 | 2 h | 1.7× | 3,000 Trading XP (Skilled) |
| Harbor Smokehouse Fresh fish order | Nevaland Harbor | Channel Catfish 75% fresh or better | 2 to 4 | 30 min | 1.6× | 1,000 Fishing XP (Apprentice) |
| Lakeside Innkeeper Fresh fish order | Nevaland Harbor | Northern Pike 75% fresh or better | 2 to 3 | 40 min | 1.65× | 1,500 Fishing XP |
| Collector's Agent Trophy order | Nevaland Harbor | Golden Arowana fine quality or better, 80% fresh or better | 1 to 2 | 60 min | 1.9× | 3,000 Fishing XP (Skilled) |
| Cold Storage Buyer Trophy order | Nevaland Harbor | White Sturgeon fine quality or better, 70% fresh or better | 1 to 2 | 60 min | 1.95× | 7,500 Fishing XP (Expert) |
| Charter Records Keeper Trophy order | Nevaland Harbor | Pacific Sailfish fine quality or better, 70% fresh or better | 1 to 2 | 2 h | 2.1× | 15,000 Fishing XP (Master) |
| Wholesale Fish Buyer Fresh fish order | Nevaland Harbor | Broadbill Swordfish 70% fresh or better | 1 to 2 | 2 h | 2× | 15,000 Trading XP (Master) |
| Tomas Fresh fish order | Sunreach Cove | Yellowfin Tuna 80% fresh or better | 1 to 2 | 40 min | 1.8× | 6,000 Fishing XP |
| Sunreach Reef Warden Trophy order | Sunreach Cove | Pacific Sailfish exceptional quality or better, 70% fresh or better | 1 | 2 h | 2.4× | 30,000 Fishing XP (Artisan) |
| Nevaland Village Preserver Produce order | Nevaland Village | Sunreach Olive | 6 to 10 | 60 min | 1.75× | 3,000 Trading XP (Skilled) |
| Tomas Fresh fish order | Sunreach Cove | Golden Sea Bream or Greater Amberjack 80% fresh or better | 1 to 2 | 40 min | 1.7× | 3,000 Fishing XP (Skilled) |
| Lakeside Taxidermist Trophy order | Nevaland Harbor | Northern Pike exceptional quality or better, 70% fresh or better, 12 to 16 kg | 1 | 60 min | 2× | 3,000 Fishing XP (Skilled) |
| Offshore Smokehouse Trophy order | Nevaland Harbor | Broadbill Swordfish exceptional quality or better, 75% fresh or better | 1 | 2 h | 2.3× | 30,000 Fishing XP (Artisan) |
| Collector's Agent Trophy order | Nevaland Harbor | Golden Arowana exceptional quality or better, 75% fresh or better | 1 | 2 h | 2.2× | 7,500 Fishing XP (Expert) |
| Harbor Innkeeper Fresh fish order | Nevaland Harbor | Rainbow Trout 90% fresh or better | 2 to 3 | 20 min | 1.8× | 1,000 Fishing XP (Apprentice) |
| Rowan Produce order | Pinewatch | Harvested Wheat | 10 to 16 | 60 min | 1.6× | 500 Trading XP |
| Pinewatch Bakehouse Fresh fish order | Pinewatch | Rainbow Trout or Yellowfin Tuna 75% fresh or better | 1 to 2 | 40 min | 1.75× | 1,000 Fishing XP (Apprentice) |
| Mara Produce order | Reedhaven | Harvested Wheat | 10 to 16 | 60 min | 1.7× | 500 Trading XP |
| Reedhaven Preserver Produce order | Reedhaven | Orchard Apple | 6 to 10 | 80 min | 1.8× | 7,500 Farming XP (Expert) |
| Ada Produce order | Highridge | Plump Tomato or Sweet Corn | 8 to 14 | 80 min | 1.85× | 1,000 Farming XP (Apprentice) |
| Highridge Innkeeper Fresh fish order | Highridge | Rainbow Trout or Yellowfin Tuna or Golden Sea Bream 75% fresh or better | 1 to 2 | 60 min | 1.9× | 3,000 Fishing XP (Skilled) |
Nothing matches. Clear a filter or try another word.
The multiple applies to the market price of what you hand in. The last column is the experience an order needs before it can be posted to you.
Delivery orders open when you report your first expedition to Silas. Each order has a deadline and a guaranteed reward. Ranks open new crops, rods, recipes and vehicles, and lower that skill's Work cost.
You get the guaranteed reward or the market value of what you delivered, whichever is higher. An order takes only crops you grew: crops off a shop shelf carry no harvest grade, so the order leaves them in your satchel. For goods no harvest grades, such as salt-cured fish, an order pays no more for each than the best village counter would. You can pass on an order you haven't started while standing at its counter; a new one takes its slot after 2 min of play, and that counter won't post the same order again for 15 min.
When weather alone blocks a prepared catch or safe delivery, the board shows a weather pause and the expected easing time. That wait preserves the order’s remaining deadline and the freshness of its required cargo in your custody. Sheltered outings continue normally; missing supplies, Work or cargo space still need preparation.
Farming, Fishing, Processing and Trading each climb this ladder separately, and each opens only its own line. Less Work applies to Farming, Fishing and Processing jobs; Trading has no Work jobs, so its ranks widen the order board instead. A number in brackets is that item's own XP gate when it opens before the rank. A rank can also open a quest, marked as one; a station that comes from a later rank's quest names it.
Seeds, produce, materials, supplies and prepared food: what each is worth, where it is sold and what makes it.
47 items, from seeds to tackle. Fish have their own list under Every fish, and the goods that belong to the story are left to the story. The base value is what the game starts from; the money section shows how season, demand and quality move it, and what a shop pays compared with what it charges.
Nothing matches. Clear a filter or try another word.
The people of the valley: who they are, where they stand through the day and which errands they give.
The valley has 10 named people. Each keeps a post, and some move on a schedule, so the person you want may be somewhere else at dusk. Talk to someone with E when you stand near them.
Nothing matches. Clear a filter or try another word.
These people leave their post at some part of the day. Anyone not listed stays at their post all day. The rest of the day follows the clock in Day, night and the seasons.
| Person | Dawn | Day | Dusk | Night |
|---|---|---|---|---|
| Elspeth | Farmhouse Yard | Farmhouse Yard | Village Inn Porch | Farmhouse Yard |
| Barnaby | Farmhouse Workbench | Village Market | Village Inn Porch | Farmhouse Workbench |
| Old Silas | Harbor Dock | Harbor Pier | Village Inn Porch | Harbor Pier |
| Maeve | Village Market Hall | Fish Market Stall | Village Market Hall | Fish Market Stall |
| Tomas | Sunreach Dock Approach | Sunreach Landing Forecourt | Sunreach Cove Gathering Corner | Sunreach Cove Gathering Corner |
| Ines | Sunreach Cistern Walk | Sunreach Cistern Walk | Sunreach Cove Gathering Corner | Sunreach Cove Gathering Corner |
How the quest log works, the first acts of the main story and every side errand that teaches the rest of the game.
Errands come from the people of the valley. Each one is a short list of things to do, and finishing the list pays out gold, goods and skill experience, and sometimes opens something new to work with.
Errands are grouped in tracks. The main story is one track; the others are side errands that open once you have learned what they ask. Tracks run side by side and each one is a straight line: no errand offers a choice, and an objective that waits on a season or the weather never holds up another track. Nothing in the log is combat. It is farming, fishing, cooking, carrying and finding.
The first acts are the game's own tutorial. Later acts are folded away at the end of this chapter.
Given by Elspeth
Reward 6 Wheat Seeds, 100 Farming XP
Given by Elspeth
Reward 25 gold, 200 Farming XP
Given by Elspeth
Reward 35 gold, 300 Farming XP
Given by Barnaby
Reward 6 Bait Worms, 200 Farming XP, 150 Processing XP
Given by Barnaby
Reward 50 gold, 4 Bait Worms, 350 Processing XP
Given by Old Silas
Reward 6 Wheat Seeds, 400 Fishing XP
Given by Elspeth
Reward 75 gold, 300 Trading XP
Given by Maeve
Reward 40 gold, 200 Trading XP
Given by Old Silas
Reward 2 Woven Lure, 350 Fishing XP
Given by Old Silas
Reward 250 gold, 1,000 Fishing XP, 600 Trading XP, 400 Farming XP
Given by Maeve
Reward 150 gold, 3 Fish Scraps, 450 Trading XP, 300 Fishing XP
Given by Barnaby
Reward 550 Farming XP
Given by Barnaby
Reward 650 Farming XP, 450 Processing XP, 350 Fishing XP
Given by Tomas
Reward 6 Sunflower Seeds, 500 Trading XP, 500 Fishing XP
Given by Ines
Reward 1 Olive Sapling, 800 Farming XP
Given by Tomas
Reward 6 Bait Worms, 2 Woven Lure, 700 Processing XP
Given by Tomas
Reward 240 gold, 900 Fishing XP, 500 Trading XP
Given by Ines
Reward 300 gold, 900 Farming XP, 650 Processing XP
Side tracks open once you have learned what they ask. They pay in the same coin as the main story, so they are worth doing whenever you want a reason to try a part of the game.
1 errand. Opens after “Three Seeds In”.
Given by Elspeth
4 errands. Opens after “Bread for Pinewatch”, at Processing rank Apprentice.
Given by Maeve
Reward 250 gold, 150 Processing XP, 200 Trading XP
Given by Maeve
Reward 250 gold, 150 Processing XP, 200 Trading XP
Given by Maeve
Reward 250 gold, 150 Processing XP, 200 Trading XP
9 errands. Opens after “The Cycle of the Soil”.
Given by Maeve
Reward 40 gold, 60 Trading XP
Given by Maeve
Reward 120 gold, 100 Trading XP
Given by Rowan
Reward 120 gold, 100 Trading XP
Given by Mara
Reward 120 gold, 100 Trading XP
Given by Ada
Reward 120 gold, 100 Trading XP
Given by Maeve
Reward 120 gold, 100 Trading XP
Given by Maeve
Reward 120 gold, 100 Trading XP
Given by Tomas
Reward 120 gold, 100 Trading XP
7 errands. Opens after “The Call of the Deep”.
Given by Old Silas
Reward 60 gold, 350 Fishing XP
Given by Old Silas
Reward 110 gold, 500 Fishing XP
Given by Old Silas
Reward 150 gold, 650 Fishing XP
Given by Old Silas
Reward 260 gold, 900 Fishing XP
Given by Old Silas
Reward 320 gold, 1,100 Fishing XP, 400 Trading XP
Given by Old Silas
Reward 400 gold, 1,400 Fishing XP
Given by Old Silas
Reward 750 gold, 5,000 Fishing XP, 500 Trading XP
5 errands. Opens after “The Cycle of the Soil”.
Given by Elspeth
Reward 8 Wheat Seeds, 4 Seed Potato, 250 Farming XP
Given by Barnaby
Reward 40 gold, 400 Farming XP
Given by Barnaby
Reward 90 gold, 450 Farming XP, 300 Trading XP
Given by Barnaby
Reward 60 gold, 1 Apple Tree Sapling, 400 Processing XP
Given by Elspeth
Reward 300 gold, 1,500 Farming XP
8 errands. Opens after “A Promise Made at the Board”.
Given by Maeve
Reward 120 gold, 600 Trading XP
Given by Maeve
Reward 140 gold, 3 Crushed Ice, 700 Trading XP, 300 Fishing XP
Given by Maeve
Reward 220 gold, 900 Trading XP, 400 Fishing XP
Given by Tomas
Reward 260 gold, 1,000 Trading XP
Given by Maeve
Reward 350 gold, 1,400 Trading XP
Given by Rowan
Reward 140 gold, 500 Trading XP
Given by Mara
Reward 180 gold, 650 Trading XP
Given by Ada
Reward 240 gold, 900 Trading XP
The rest of the main story, from the end of Act 7, and the errands that open once it turns. Titles and objectives here will tell you where the story is going.
Given by Tomas
Given by Ines
Reward 120 gold, 700 Farming XP
Given by Tomas
Reward 200 gold, 900 Fishing XP
Given by Ines
Reward 180 gold, 900 Processing XP, 300 Fishing XP
Given by Tomas
Reward 240 gold, 1,000 Trading XP
Given by Ines
Reward 300 gold, 600 Farming XP, 600 Trading XP
Given by Elspeth
Given by Old Silas
Reward 200 gold, 900 Fishing XP
Given by Old Silas
Reward 400 gold, 1,400 Fishing XP, 500 Trading XP
Given by Maeve
Reward 350 gold, 1,400 Trading XP
Given by Maeve
Reward 1,200 Trading XP, 600 Fishing XP
Given by Elspeth
Reward 500 gold, 800 Farming XP, 800 Fishing XP, 800 Processing XP, 800 Trading XP
Given by Barnaby
Given by Old Silas
Given by Old Silas
Given by Old Silas
Given by Elspeth
Given by Elspeth
Given by The Keeper
Reward 300 Processing XP
Given by Old Silas
Given by Mara
Given by Tomas
Given by Ines
Given by Rowan
Given by Ada
Given by Mara
Given by Maeve
Given by Tomas
Given by Ines
Given by Ines
Given by Maeve
Given by Old Silas
Given by Elspeth
Given by The Keeper
Given by Ada
Given by Maeve
Given by Maeve
Given by Barnaby
Given by Elspeth
Given by Maeve
Given by Old Silas
Given by Elspeth
Given by Maeve
Given by Elspeth
Given by Maeve
Reward 1 The Round Loaf
Given by Old Silas
Given by Ines
Given by Maeve
Given by The Keeper
Given by Old Silas
Given by Maeve
Given by Elspeth
Given by Maeve
Given by Old Silas
Common questions, the words the game uses and how this guide is made.
No. There are no weapons, no hostile creatures and no fighting. The pressure comes from weather, timing, how much you can carry, how fresh a catch stays, the roads and sea between villages, and the people waiting at the other end.
The game saves by itself as you play and keeps the save in your browser, on the device you play on. There is no cloud copy, so clearing this site's data in your browser deletes the save. Open the game in the same browser to carry on.
Crops you have already planted keep growing and jobs you have already started keep running, for up to 72 hours away. Work comes back too, at 5 every 5 minutes. The calendar, the weather and the rest of the world wait for you. Nothing is harvested, sold, fished or repaired on your behalf.
Hands-on jobs cost Work: planting, harvesting, crafting, packing and fishing. Walking, sailing, riding, carrying cargo, trading and talking do not. The Work section lists the costs and every way to earn Work back.
Sell them quickly, keep them in an iced boat hold, or pack them with ice. A fish loses freshness with every minute and is worth less as it does, until it spoils and cannot be sold. Freshness and spoilage has the figures, and Storage lists the places that slow it.
The family rowboat is yours after the harbor errands in the main story, and it is the boat you start on. The Coastal Fishing Skiff costs 850 gold and needs 7,500 Fishing XP (Expert). The rest are in Boats.
Your satchel holds 20 slots. Past that, use storage at the farm and the harbor, a donkey, a carriage or wagon on land, or a boat's holds on water. See Cargo and carriers.
A shop buys at one price and sells at a higher one, so buying something and selling it straight back loses gold. Profit comes from carrying goods to a place that wants them. The money section and the trade-run planner show the sums.
Not unless you ask it to. The first acts of the main story are in the open because they are the tutorial. Later acts, the late side tracks and the story-only vessel are folded away and left out of search. The spoiler switch at the top of the page turns them on, and your choice is remembered on this device.
This guide is built from the game itself. Every crop, fish, price, recipe, boat and errand on these pages is read from the same content and rules the game runs on, and the page is rebuilt whenever they change. If the game and this guide ever disagree, the game is right and the guide needs a rebuild.
It leaves out what people say and what the story reveals, because that is better met in the game. It is English only for now.